RPC学习:进阶到 gRPC
所有代码详见代码仓库,rpc、grpc 目录
一、RPC 入门
1.1 介绍
RPC 全称叫做远程过程调用,是分布式系统中不同节点通信的一种流行的方式。我在刚开始学习的时候一直有一个误区,就是 RPC 是服务端调用客户端使用的,在实践上手后才恍然大悟,它是服务端与服务端之间的事件。
在刚刚入门的阶段的时候,我还有一个小小的疑问:那就是我直接用 http 传输,然后用 json 格式转换消息不行吗?首先需要先明白几个概念,json 是一种数据格式,而 rpc 顾名思义是像在本地一样执行远程的函数,而 http 是一种传输协议。使用 json 请求数据然后再通过 json 获取数据转换为对应的对象或数据结构,这是一次可行的方法,但是 RPC 的侧重点不在于此,这种只是底层数据交互的一种方案,RPC 让我们忽略底层数据的传输通信细节,而专注于业务上,并且它还支持跨语言的特性。使用 http + json 也是 RPC 实现的一种方案。
围绕 RPC 的开发应用,我们可以将开发人员分为三种角色:
- 服务端方法实现者;
- 客户端方法调用者;
- 接口方法设计者;
下面从官方提供的默认 net/rpc 来学习。
1.2 接口设计
下面先从接口开始设计
官方默认的 rpc 方法都是两个默认输入参数然后一个 error 接口类型的返回值。
两个输入的参数可以是任意类型,第一个参数是用于调用方传入的参数,调用者只能传入一个参数,但是因为数据类型不限定,所以我们可以自己设计结构体然后传输,第二个参数是一个指针类型,用于返回给调用者的结果,返回值 error 如果执行中途有任何错误,用于返回错误用的。
./commom/user.go
package common

/**
* @Author: xxcheng
* @Email developer@xxcheng.cn
* @Date: 2024/1/3 16:13
 */

type User struct {
    Username string
    Age      int
    Friends  []*User
}
./server/main.go
type HelloServiceIF interface {
    Hello(request string, reply *string) error
    Ping(request int, reply *int) error
    Info(request common.User, reply *common.User) error
}
1.3 方法实现者
根据上面的接口来一个实现类结构体
./server/main.go
// ...

type HelloService struct {
    User string
}

func (h *HelloService) Hello(request string, reply *string) error {
    fmt.Printf("receive msg:%s\n", request)
    *reply = fmt.Sprintf("hello,%s", h.User)
    return nil
}
func (h *HelloService) Ping(request int, reply *int) error {
    fmt.Printf("receive msg:%d\n", request)
    *reply = 111
    return nil
}
func (h *HelloService) Info(request common.User, reply *common.User) error {
    fmt.Println(request)
    *reply = common.User{
        Username: "服务器:" + request.Username,
        Age:      request.Age + 1,
    }
    return nil
}
上面将提供给远程调用的结构体和方法写完后,再写服务器,来对外暴露服务。
实现我们用 rpc.NewServer() 创建一个新的 RPC 服务,然后我们初始化一个我们自定义的服务注册到 rpc 服务中,我们可以调用 Register 或者 RegisterName 方法来注册,一个是通过反射以结构体名自动设置为服务名,另外一个是指定了服务名。
这里我们创建了一个 tcp 协议的 listener 来对外暴露服务。
func main() {
    rpcServer := rpc.NewServer()
    err := rpcServer.Register(&HelloService{
        User: "xxcheng",
    })
    if err != nil {
        fmt.Println("rpc register error")
        panic(err)
    }
    listener, err := net.Listen("tcp", ":1234")
    if err != nil {
        fmt.Println("net listen error")
        panic(err)
    }
    for {
        conn, err := listener.Accept()
        if err != nil {
            fmt.Println("listener Accept error")
            panic(err)
        }
        go func() {
            rpcServer.ServeConn(conn)
        }()
    }
}
1.4 方法调用者
./client/main.go
package main

import (
    "fmt"
    "go_learn/rpc/base/common"
    "net"
    "net/rpc"
)

/**
* @Author: xxcheng
* @Email developer@xxcheng.cn
* @Date: 2024/1/3 15:50
 */

func main() {
    conn, err := net.Dial("tcp", "localhost:1234")
    if err != nil {
        panic(err)
    }
    client := rpc.NewClient(conn)
    var reply string
    if err = client.Call("HelloService.Hello", "hello", &reply); err != nil {
        panic(err)
    }
    fmt.Printf("reply:%s\n", reply)
    var reply2 int
    if err = client.Call("HelloService.Ping", 888, &reply2); err != nil {
        panic(err)
    }
    fmt.Printf("reply:%d\n", reply2)

    var reply3 common.User
    if err = client.Call("HelloService.Info", common.User{
        Username: "xxcheng",
        Age:      66,
    }, &reply3); err != nil {
        panic(err)
    }
    fmt.Printf("reply:%v\n", reply3)
}
1.5 实现效果
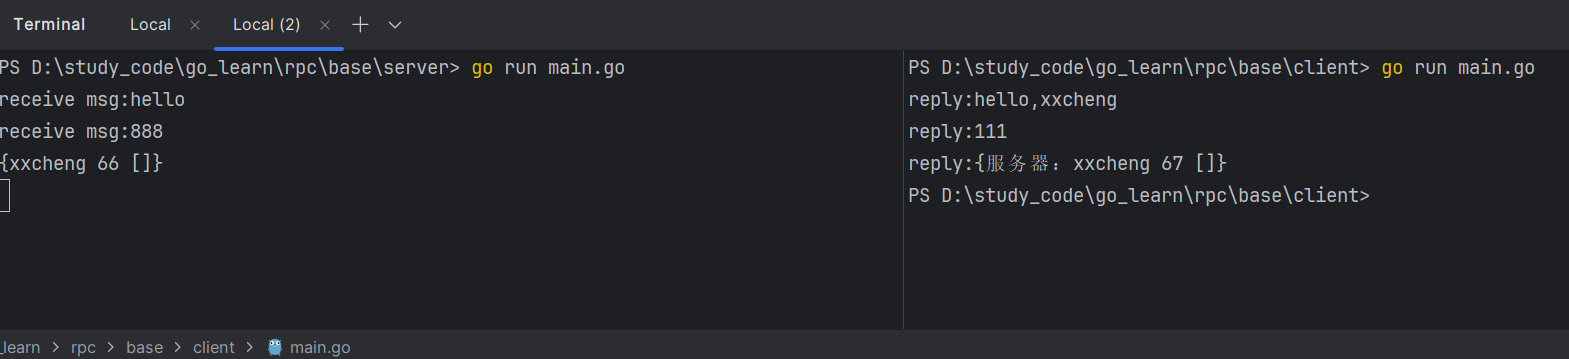
1.6 json 传输
这里学习使用官方提供的 net/rpc/jsonrpc 包来实现 json 格式传输实现 RPC。
将 client 端的 client := rpc.NewClient(conn) 改为 client := rpc.NewClientWithCodec(jsonrpc.NewClientCodec(conn))
将 server 端的 rpc.ServeConn(conn) 改为 rpcServer.ServeCodec(jsonrpc.NewServerCodec(conn))
重新编译执行,效果和上面没有什么区别。
为了可以看到具体区别,将 server 端关闭,然后使用 nc 模拟 server 端,然后再调用查看 nc 的输出。
D:\software\netcat>nc -l -p 1234
{"method":"HelloService.Info","params":[{"Username":"xxcheng","Age":90,"Friends":null}],"id":0}
打开 jsonrpc 包,查看他们结构体:
type clientRequest struct {
    Method string `json:"method"`
    Params [1]any `json:"params"`
    Id     uint64 `json:"id"`
}

type serverRequest struct {
    Method string           `json:"method"`
    Params *json.RawMessage `json:"params"`
    Id     *json.RawMessage `json:"id"`
}
type clientResponse struct {
Id uint64 `json:"id"`
Result *json.RawMessage `json:"result"`
Error any `json:"error"`
}
type serverResponse struct {
Id *json.RawMessage `json:"id"`
Result any `json:"result"`
Error any `json:"error"`
}二、protobuf 结合 RPC
2.1 介绍
protobuf 是一种和 json、xml 一样的描述语言,可以将数据序列化以及反序列号,由 Google 推出,同时我们可以通过官方或者第三方插件实现代码生成的能力。刚开始不了解时,我总是把 protobuf 看得很高大上,以为它就是 grpc ,这两个不是一个东西,因为网上的很多教程都是把两个一起来讲述学习的。grpc 只是使用 protobuf 传输数据,是一个 rpc 的实现,而 protobuf 只是一种描述语言格式。
相对于 json 来说,它是经过高效压缩的,传输数据量更小,这样那也会带来一些牺牲,就是它不利于阅读。
protobuf 有两个版本 proto2 和 proto3。学习都是以新版本为主的,这里就以 proto3 版本为例来学习 protobuf。
2.2 基本示例
下面这个是后面用于 protobuf 学习的基本模板。
先对几个简单的语法做个简单的介绍:
-
syntax当前的protobuf版本; -
package对应语言代码生成后的包名; -
go_packagego语言代码生成后包的相对路径; -
message这是protobuf数据传输的基本数据单元,可以看作go中的结构体,它支持嵌套。里面的基本格式是
数据类型 变量名=序号 -
service是一系列服务的集合,我们可以在里面定义多个服务;里面的基本格式是
rpc 服务名(接收message)returns(返回message)接收message和返回message都不能缺少!
syntax = "proto3";

package simpleGRPC;


option go_package="/pb/simple";


message HelloReq{
  string title=1;
}
message HelloResp{
  string reply=1;
}

service SimpleService{
  rpc Hello(HelloReq)returns(HelloResp);
}
2.3 生成 Go 代码
我们可以通过如下命令生成对应的 Go 代码
protoc --go_out=. simple.proto但是如果是第一次执行,没有装过环境,那肯定就会报错的。
- 先安装
protobuf; - 然后按照
protoc-gen-go
# protobuf 直接下载可执行文件
https://github.com/protocolbuffers/protobuf/releases
# protoc-gen-go 使用 go 安装
# see https://grpc.io/docs/languages/go/quickstart/
go install google.golang.org/protobuf/cmd/protoc-gen-go@v1.282.4 输出打印
前面说了 protobuf 就和 json、xml 一样,那么它们具体的格式是怎么样的呢?现在就让我们来一探究竟。
考虑到有无法正常打印出来的内容,这里贴出运行截图
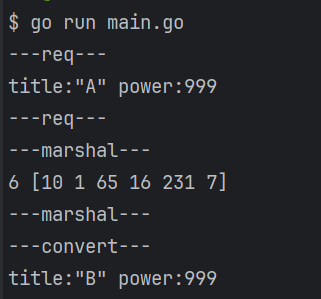
[10 1 65 16 231 7] 就是序列化后的数组结果,总共占用6个字节的位置,它的确很小但是根本无法阅读。
我们知道 A 的 ASCII 正好是 65,我们把数组第3个改成 66,然后序列化回去,发现原来是 A 变成了 B。
package main

import (
    "fmt"
    "go_learn/rpc/protoc/pb/simple"
    "google.golang.org/protobuf/proto"
)

/**
* @Author: xxcheng
* @Email developer@xxcheng.cn
* @Date: 2024/1/4 14:39
 */

func main() {
    req := &simple.HelloReq{
        Title: "A",
        Power: 999,
        Ok:    false,
    }
    fmt.Println("---req---")
    fmt.Println(req)
    fmt.Println("---req---")
    bs, err := proto.Marshal(req)
    if err != nil {
        return
    }
    fmt.Println("---marshal---")
    fmt.Println(len(bs), bs)
    fmt.Println(string(bs))
    fmt.Println("---marshal---")
    fmt.Println("---convert---")
    bs[2] = 66
    req2 := new(simple.HelloReq)
    err = proto.Unmarshal(bs, req2)
    if err != nil {
        return
    }
    fmt.Printf("%+v", req2)
}代码:完整代码
三、gRPC 学习
3.1 介绍
gRPC 是 Google 基于 protobuf 开发的开源 RPC 框架,它基于 HTTP2.0 协议传输。
HTTP2.0 的特点
- 二进制传输;
- 首部压缩(HPACK算法);
- 主动推送;
- 多路复用;
gRPC 支持流式调用,支持单向流和双向流,所谓流,就是一次请求,可以多次传输数据。
在 proto 定义文件中,使用 stream 开启流特性,举例:
service HelloService {
    rpc Hello (String) returns (String);
    rpc Channel (stream String) returns (stream String);
}
3.2 上手
3.2.1 依赖安装
在前面使用 protobuf 的 Go 代码基础上,我们还要用 protobuf 生成 gRPC 的 Go 代码。
使用如下参考命令:
protoc --go-grpc_out=. simple.proto同样的,需要安装 grpc 代码生成插件环境
# see https://grpc.io/docs/languages/go/quickstart/
go install google.golang.org/grpc/cmd/protoc-gen-go-grpc@v1.2
3.2.2 proto 定义
simple.proto
syntax = "proto3";

package simpleGRPC;


option go_package="/pb/simple";


message HelloReq{
  string title=1;
}
message HelloResp{
  string reply=1;
}

service SimpleService{
  rpc Hello(HelloReq)returns(HelloResp);
}
3.2.3 代码分析
根据上面的 proto 文件,总共需要执行两条命令。
protoc --go_out=. simple.proto
protoc --go-grpc_out=. simple.proto
生成后的代码会帮我们先各生成一个服务端接口和客户端接口,然后生成一个服务端接口伪实现的结构体和一个客户端真实现的结构体。
接口定义:
type SimpleServiceClient interface {
    Hello(ctx context.Context, in *HelloReq, opts ...grpc.CallOption) (*HelloResp, error)
}

type SimpleServiceServer interface {
    Hello(context.Context, *HelloReq) (*HelloResp, error)
    mustEmbedUnimplementedSimpleServiceServer()
}
伪实现服务端接口的结构体
// UnimplementedSimpleServiceServer must be embedded to have forward compatible implementations.
type UnimplementedSimpleServiceServer struct {
}

func (UnimplementedSimpleServiceServer) Hello(context.Context, *HelloReq) (*HelloResp, error) {
    return nil, status.Errorf(codes.Unimplemented, "method Hello not implemented")
}
func (UnimplementedSimpleServiceServer) mustEmbedUnimplementedSimpleServiceServer() {}
实现客户端接口的结构体
type simpleServiceClient struct {
    cc grpc.ClientConnInterface
}

func NewSimpleServiceClient(cc grpc.ClientConnInterface) SimpleServiceClient {
    return &simpleServiceClient{cc}
}

func (c *simpleServiceClient) Hello(ctx context.Context, in *HelloReq, opts ...grpc.CallOption) (*HelloResp, error) {
    out := new(HelloResp)
    err := c.cc.Invoke(ctx, SimpleService_Hello_FullMethodName, in, out, opts...)
    if err != nil {
        return nil, err
    }
    return out, nil
}
3.2.4 服务端代码
因为生成的代码是伪实现的,所以需要我们自己去实现一个服务端的结构体
type SimpleServiceServer struct {
    simple.UnsafeSimpleServiceServer
}

func (s *SimpleServiceServer) Hello(ctx context.Context, req *simple.HelloReq) (resp *simple.HelloResp, err error) {
    title := req.Title
    reply := fmt.Sprintf("receive msg:[%s],reply:%d", title, time.Now().Unix())
    return &simple.HelloResp{
        Reply: reply,
    }, nil
}
实现完之后就是和之前官方提供的 RPC 一样,都是基本操作。
- 新建一个
gRPC服务器; - 初始化
SimpleServiceServer服务组; - 将
SimpleServiceServer服务组注册到gRPC服务器实例上; - 创建一个监听端口,然后让
gRPC服务器实例去监听;
func main() {
    s := grpc.NewServer(grpc.Creds(insecure.NewCredentials()))
    service := new(SimpleServiceServer)
    simple.RegisterSimpleServiceServer(s, service)
    listener, err := net.Listen("tcp", ":1234")
    if err != nil {
        panic(err)
    }
    fmt.Println("server working...")
    err = s.Serve(listener)
    defer s.Stop()
    if err != nil {
        panic(err)
    }
}
3.2.5 客户端代码
客户端就简单多了,因为帮我们实现了客户端实现,我们直接调用就好了。
- 创建拨号器;
- 创建客户端实例;
- 发起调用;
func main() {
    //使用不安全的方式传输
    conn, err := grpc.Dial("localhost:1234", grpc.WithTransportCredentials(insecure.NewCredentials()))
    if err != nil {
        panic(err)
    }
    defer func() {
        _ = conn.Close()
    }()
    client := simple.NewSimpleServiceClient(conn)
    resp, err := client.Hello(context.Background(), &simple.HelloReq{
        Title: "a b c",
    })
    if err != nil {
        panic(err)
    }
    fmt.Printf("resp:%s\n", resp.Reply)
}
3.3 流
流分为单向流和双向流。
双向流双端的接口类型相同,具体如下:
type SimpleService_HelloServer interface {
    Send(*HelloResp) error
    Recv() (*HelloReq, error)
    grpc.ServerStream
}
单向流接收端和发送端接口类型不同,具体如下:
type SimpleService_HelloForeverServer interface {
    Send(*HelloResp) error
    grpc.ServerStream
}
type SimpleService_HelloForeverClient interface {
Recv() (*HelloResp, error)
grpc.ClientStream
}这个对我来说不是很重要,直接放实现代码
四、gRPC 进阶学习
4.1 SSL 证书认证传输
4.1.1 单证书实现
一些命令
protoc --go_out=. simple.proto
protoc --go-grpc_out=. simple.proto

# 先去编辑openssl.cnf 文件
# 生成server密钥
openssl genrsa -out server.key 2048
# 生成csr请求文件
openssl req -new -nodes -key ./server.key -out ./server.csr -config openssl.cnf -extensions 'v3_req'
# 生成server公钥
openssl x509 -req -in ./server.csr -out ./server.pem -CAcreateserial -extfile ./openssl.cnf -extensions 'v3_req' -signkey ./server.key实现代码:实现代码
4.1.2 CA 证书实现
一些命令
# run.sh
protoc --go_out=. simple.proto
protoc --go-grpc_out=. simple.proto

# crts/run.sh
# 先去编辑openssl.cnf 文件
# 生成ca证书密钥
openssl genrsa -out ca.key 2048
# 生成ca csr请求文件
openssl req -new -key ca.key -out ca.csr
# 生成ca公钥
openssl x509 -req -days 3650 -in ca.csr -signkey ca.key -out ca.pem


# 给server颁发证书
openssl genrsa -out server.key 2048
openssl req -new -nodes -key ./server.key -out ./server.csr -config openssl.cnf -extensions 'v3_req'
openssl x509 -req -in ./server.csr -out ./server.pem -CA ca.pem -CAkey ca.key -CAcreateserial -extfile ./openssl.cnf -extensions 'v3_req'

# 给client颁发证书
openssl genrsa -out client.key 2048
openssl req -new -nodes -key ./client.key -out ./client.csr -config openssl.cnf -extensions 'v3_req'
openssl x509 -req -in ./client.csr -out ./client.pem -CA ca.pem -CAkey ca.key -CAcreateserial -extfile ./openssl.cnf -extensions 'v3_req'实现代码:实现代码
4.2 Token 认证
实现代码:实现代码
4.3 拦截器
gRPC 有两种拦截器,普通函数的 grpc.UnaryInterceptor 和 流函数的 grpc.StreamInterceptor。
这里学习普通函数的拦截器。
拦截器需要在初始化 gRPC 服务器的时候传入一个经过 grpc.UnaryInterceptor 加工处理的 `grpc.sUnaryServerInterceptor 函数,然后返回一个 grpc.ServerOption 添加到 gRPC 服务器实例中。
相关代码
func UnaryInterceptor(i UnaryServerInterceptor) ServerOption {
    return newFuncServerOption(func(o *serverOptions) {
        if o.unaryInt != nil {
            panic("The unary server interceptor was already set and may not be reset.")
        }
        o.unaryInt = i
    })
}

type ServerOption interface {
    apply(*serverOptions)
}

type UnaryServerInterceptor func(ctx context.Context, req any, info *UnaryServerInfo, handler UnaryHandler) (resp any, err error)
UnaryServerInterceptor 类型函数传入4个参数,输出2个返回值。
先看传入参数:
- 第一个参数,上下文环境;
- 第二个参数,请求的数据,可以发现前两个参数就是普通函数的那两个参数;
- 第三个参数,匹配到
gRPC方法信息; - 第四个参数,就是我们自己实现的具体函数;
然后看返回值,这两个返回值就是和我们自己写的方法一样的返回值。
在我们拦截器内部,我们需要调用 handler,传入前两个参数,然后将执行后的返回值再加工或者直接返回。
示例:
grpc.UnaryInterceptor(func(ctx context.Context, req any, info *grpc.UnaryServerInfo, handler grpc.UnaryHandler) (resp any, err error) {
    fmt.Println("----------------")
    fmt.Println(ctx)
    fmt.Println(req)
    fmt.Println(info)
    fmt.Println(handler)
    fmt.Println("----------------")
    return handler(ctx, req)
}),五、参考
本作品采用 知识共享署名-相同方式共享 4.0 国际许可协议 进行许可。
woc,太厉害了!!